Stop Scrolling: the Ultimate Non Dairy Desserts — Quick Gluten Free Desserts + Gluten Free Egg Free Desserts (egg Free Baking, Zero Fuss) Featuring Gluten Free Dairy Free Recipes Dessert, Dairy and Egg Free Desserts, Egg Free Cookies Recipes, Dessert Recipes Without Eggs, Vegan and Gluten Free Desserts, Desserts Without Eggs
Picture this: a pan of glossy, crunchy, chocolate-topped bars that take 15 minutes and require zero oven time. No eggs, no dairy, no gluten, no drama. You make them now; they disappear later. That’s the deal. If your pantry holds nut butter, cereal, and chocolate, you’re basically minutes away from dessert domination.
These No-Bake Chocolate Almond Butter Crispy Bars hit every checkbox the modern sweet tooth cares about. They’re fast, they’re flexible, and they taste like a candy bar grew up and learned about balance. We’re talking textural contrast, sweet-salty magic, and a snap that makes you feel like a pastry pro. Big flavor, small effort — because you’ve got better things to do than babysit a whisk.
Why You’ll Love This Recipe
It’s the dessert that says “I’ve got you” when you need something sweet in a pinch. No oven, no eggs, and no complicated steps — just melt, mix, press, and chill. The payoff is wild.
It nails the “non dairy desserts” brief while staying firmly in the lane of quick gluten free desserts. Translation: you can serve a crowd with allergies and still get compliments that feel slightly excessive.
Think of it as a greatest hits mash-up: gluten free egg free desserts with the bold flavor and crunch of a classic candy bar. The chocolate topping gives a clean snap, the cereal brings the crunch, and the nut butter holds it together like a tiny edible miracle.
Ingredients
- 2 1/2 cups certified gluten-free crispy rice cereal (check the label for GF verification)
- 1/2 cup creamy almond butter (or sunflower seed butter for nut-free)
- 1/3 cup pure maple syrup (or agave syrup)
- 2 tablespoons coconut oil (plus 1 teaspoon for topping)
- 1 teaspoon vanilla extract
- 1/4 teaspoon fine sea salt
- 1 cup dairy-free dark chocolate chips
- Optional: 2 tablespoons shredded coconut, chopped nuts, or freeze-dried berries mixed into the base
Pro tip: If your almond butter is super stiff, gently warm the jar first to make mixing easier.
Instructions
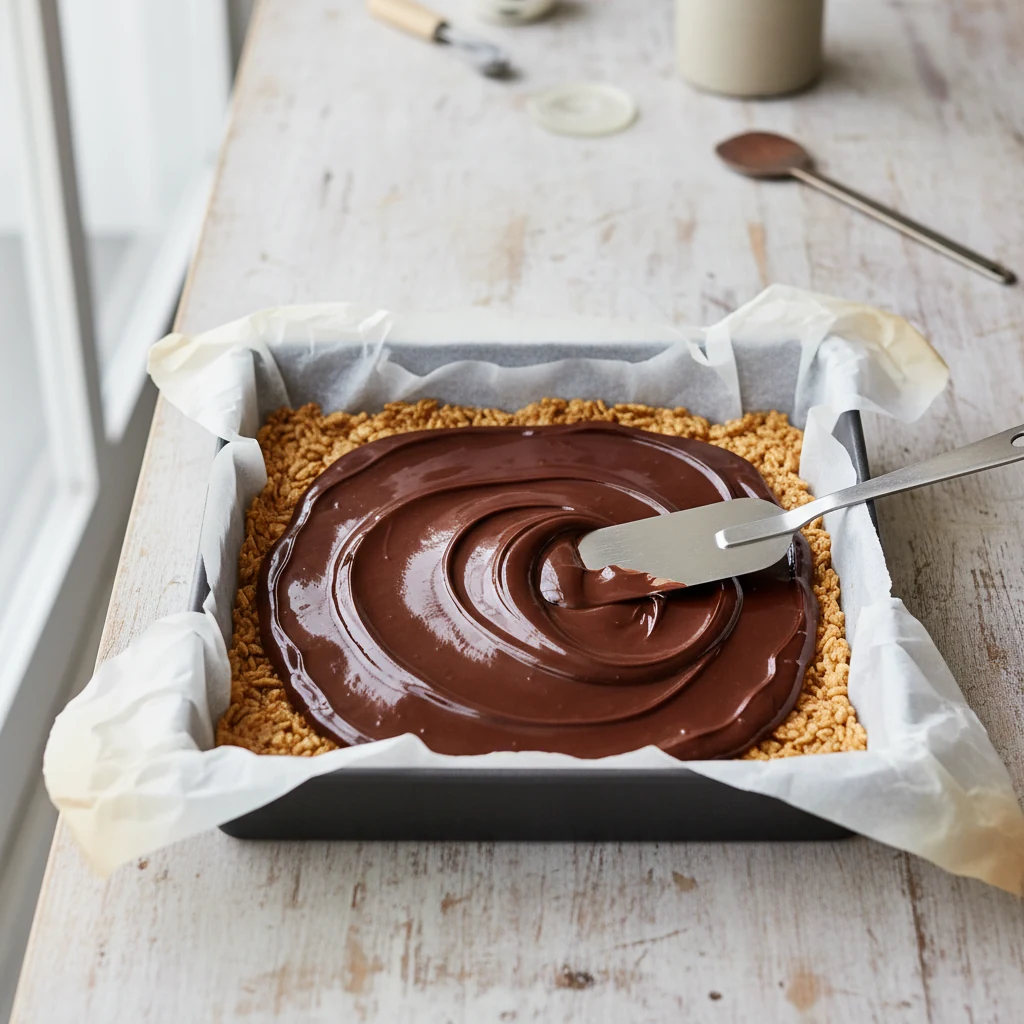
- Line an 8×8-inch pan with parchment, leaving overhang so you can lift the bars out later. Don’t skip this.
- In a medium saucepan over low heat, add almond butter, maple syrup, and 2 tablespoons coconut oil. Stir until smooth and glossy, about 2–3 minutes.
- Remove from heat. Stir in vanilla and salt. Taste and adjust salt — a barely-there salty finish makes the chocolate sing.
- Add the crispy rice cereal. Fold gently until every piece looks coated. Be gentle so the cereal keeps its crunch.
- Press the mixture into the lined pan. Use a spatula or the back of a measuring cup to level the top, pressing firmly but not aggressively.
- Place chocolate chips and 1 teaspoon coconut oil in a heatproof bowl. Microwave in 20–30 second bursts, stirring between, until smooth. Or melt over a double boiler.
- Pour melted chocolate over the base. Tilt the pan or use an offset spatula to spread evenly to the edges.
- Chill in the fridge for at least 30 minutes, or until the chocolate sets and the base firms up.
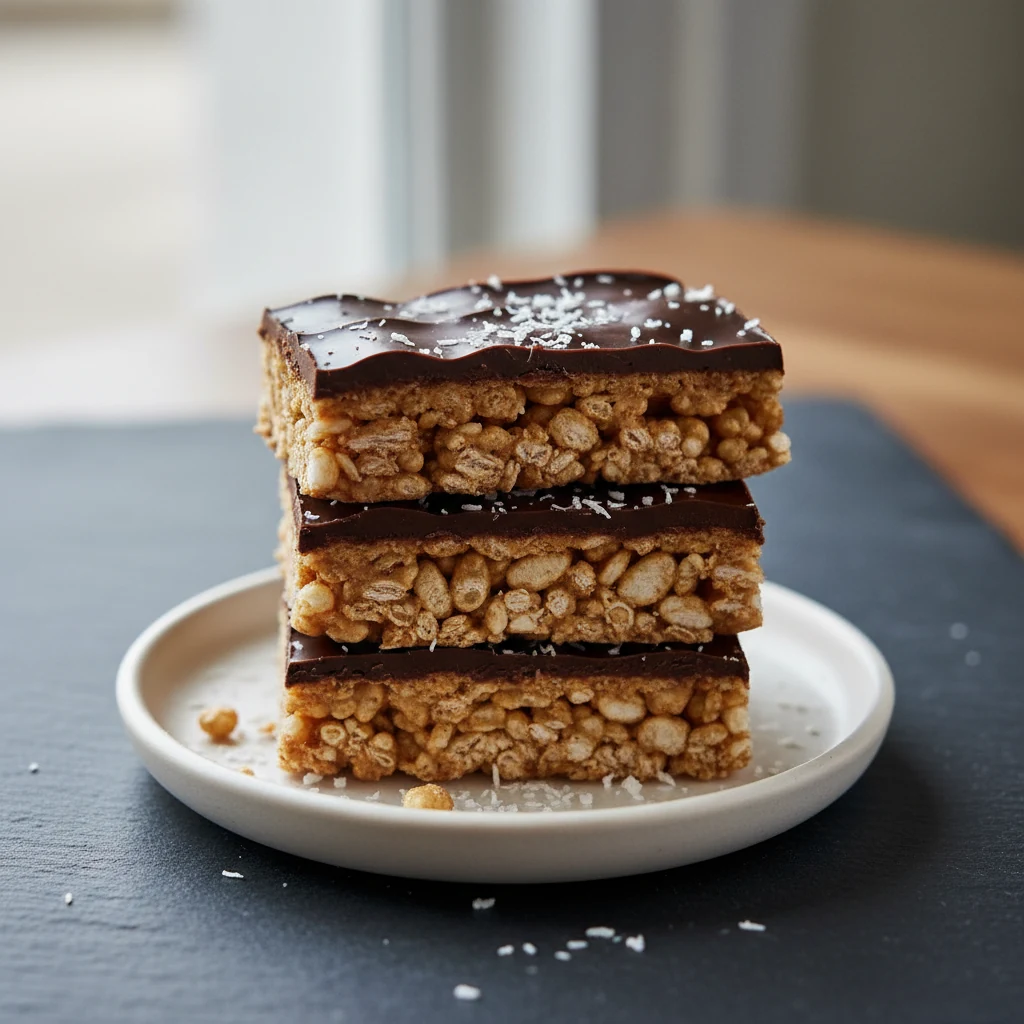
- Lift out using parchment, place on a board, and cut into bars or squares. Wipe the knife between cuts for clean edges (yes, it matters).
- Devour immediately or stash for later. Pretend you’re saving them for guests. You’re not.
Keeping It Fresh
Store bars in an airtight container in the fridge for up to 7 days. Keep layers separated with parchment to protect that crisp snap.
For longer storage, freeze for up to 2 months. Thaw at room temp 10–15 minutes for best texture. No soggy bottoms, thanks.
If your kitchen runs warm, the chocolate may soften. Refrigeration keeps the structure tight and the crunch intact. Consider this your edible insurance policy.
Benefits of This Recipe
- Allergy-friendly: It’s a slam dunk for gluten free dairy free recipes dessert and firmly in the desserts without eggs club.
- Fast: Quick gluten free desserts should be, you know, quick. This one is start-to-snack in about 45 minutes, including chill time.
- Flexible: Swap nut butter, change the chocolate, add crunchy mix-ins. It’s a choose-your-own-adventure situation.
- No bake: When the oven feels like a commitment, this is your no-sweat answer.
- Kid-approved: Sweet but not cloying, and easy for little hands to help with. Less mess than cookie dough, too.
- Portable: Great for lunchboxes, picnics, or “I must bribe my coworkers” moments.
- Smart ingredients: Maple syrup for natural sweetness, dark chocolate for antioxidants, and cereal for that snacky crunch.
- On-brand: Checks boxes for vegan and gluten free desserts, dairy and egg free desserts, and gluten free egg free desserts without taste compromise.
Common Mistakes to Avoid
- Using non-GF cereal: If you need gluten-free, make sure the cereal is certified. Labels matter.
- Overheating chocolate: Burnt chocolate tastes like sad campfire smoke. Melt low and slow.
- Skipping parchment: You’ll fight the pan and lose. Line it and lift with ease.
- Pressing too hard: You’re making bars, not bricks. Firm pressure, not fury.
- Too much liquid: Extra syrup or oil can make bars greasy. Measure, don’t eyeball like a chaos goblin.
- Warm slicing: If chocolate isn’t set, you’ll smear the top. Chill first for clean cuts.
- Unbalanced salt: A tiny pinch elevates flavor. Don’t fear the salt; respect it.
Variations You Can Try
- Peanut Butter Cup Bars: Swap almond butter for peanut butter and sprinkle crushed peanuts on top.
- Nut-Free SunButter: Use sunflower seed butter for school-safe, allergy-friendly bars.
- Mocha Crunch: Add 1 teaspoon instant espresso to the melted chocolate. Coffee shop vibes.
- Mint Chocolate: Stir 1/4 teaspoon peppermint extract into the topping for a cool finish.
- Orange Zest: Micropane 1 teaspoon orange zest into the chocolate for citrusy brightness.
- Trail Mix Upgrade: Fold in chopped dried cherries and toasted pumpkin seeds to the base.
- No-Bake “Cookies”: Skip the pan. Spoon mounds onto parchment, top with a drizzle of chocolate, and chill.
- Tahini Twist: Swap half the almond butter for tahini. Nutty, slightly savory, unbelievably good.
FAQ
Are these bars truly gluten-free, dairy-free, and egg-free?
Yes, as long as you use certified gluten-free crispy rice cereal and dairy-free chocolate. The recipe contains zero eggs and uses plant-based fats and sweeteners, so it fits the “non dairy desserts” and “desserts without eggs” categories easily.
Can I make these without coconut?
Absolutely. Swap the coconut oil for refined avocado or light olive oil in the base, and use dairy-free chocolate without added coconut. Texture will still hold, FYI.
What can I use instead of maple syrup?
Agave syrup works well and keeps the bars vegan. If using honey, the bars won’t be strictly vegan, but the structure and sweetness still work.
How do I keep the bars from crumbling?
Measure the cereal accurately and press the base firmly, not aggressively. If the mixture seems dry, add 1–2 teaspoons extra almond butter and stir thoroughly before pressing.
Can I turn this into an egg free cookies recipe?
Yes. Scoop the mixture into cookie mounds on parchment and top with melted chocolate. Chill to set. You’ll get chewy, crispy, egg free “cookies” with no bake time.
Can I make these sugar-free?
Use sugar-free dairy-free chocolate and a sugar-free syrup alternative that thickens (like allulose syrup). Sweetness will drop, so taste the base and adjust with a pinch of extra salt or vanilla.
How long do they take to set?
Thirty minutes in the fridge usually does it. If you want glassy chocolate and very clean cuts, give it 45–60 minutes. Patience pays, IMO.
What size pan works best?
An 8×8-inch pan makes bars with a nice bite thickness. For thinner bars, use a 9×9-inch pan; for thicker bars, go smaller or double the recipe for a 9×13-inch pan.
Final Thoughts
These crispy chocolate bars deliver maximum payoff with minimal effort. They tick every box: vegan and gluten free desserts, dairy and egg free desserts, and the holy grail of quick gluten free desserts.
Serve them at parties, stash them in the freezer, or just make a pan for you and your inner eight-year-old. No judgment, only chocolate.